
Cardigan Hexagon Free Written Pattern
Size best fit Medium
Hook:6
Tension: Large
Tips.
After the cardigan is finished, wet and iron (low hit) , unstretching a little bit. It will make it longer and softer.
Grad of difficulty : High
For advanced .
-4 Colours of yarn (500-600g)
-Needle
Alternate colours as you like.
Abbreviation
CH – chain
DC -double crochet
ST -stitch
SC -single crochet
SL ST -slip stitch
SP -space
REP -repeat
Beg- begin
The cardigan starts with the hexagon: See scheme.

Top Body and Half Sleeve
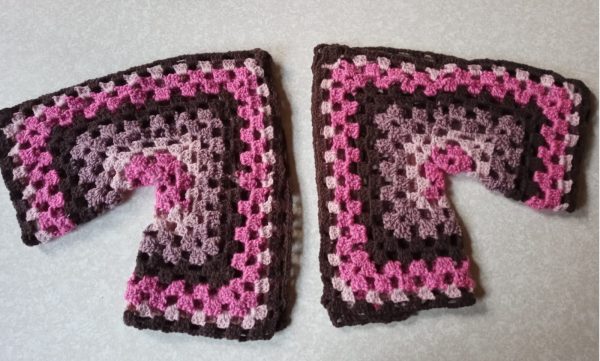
Hexagon 15 rounds in total for one part. Need 2 parts and its building the top and half sleeve..See pic.A
Rd 1.Magic circle or ch 3.
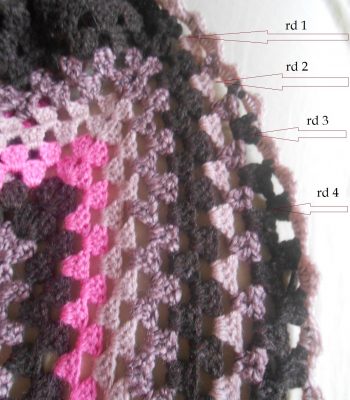
Rd 2.Start with ch 4, continue make 3 x dc,ch 2 sp, ,rep.5 times more and finish with 2xdc,sl st at the top of the ch 2 made at the beg…Total 6 loops.Mark the 6 loops.This are the corners of the hexagon.
Rd 3.From where is finished rd 2,make ch 4 and go to the next loop (where is the marker) and make in the same loop ( 3 x dc, ch 2,3 x dc) then ch 2 and go to the next loop and rep .Move the marker in the loop created between the 2 groups made in the same loop.At the end of the rd last group make 2 x dc and join at the top with sl st with the first ch 2 made at the begin.
Rd 4.From where is finished make ch 4,go to the next loop and make (3 x dc, ch 2,3 x dc )
then ch 2 ,in the next loop make one 3xdc,ch 2 and rep.Last group 2xdc join sl st at the top of the ch 2 made at the beg.
Rd 5.Always move the marker keep the corners .With each round made will increase the loops between corners.
(3 x dc, ch 2,3 x dc ),ch2, (3 x dc, ch 2,3 x dc ),ch2, , (3 x dc, ch 2,3 x dc ) and rep.
Rd 6.The same as rd 5 but you will have 3 loops between groups
(3 x dc, ch 2,3 x dc ),ch2, , (3 x dc, ch 2,3 x dc ),ch2, , (3 x dc, ch 2,3 x dc ) ch2, (3 x dc, ch 2,3 x dc ) and rep.
Rd7 to Rd 15 is repeating and is increasing the numbers of the loops between corners. Always keep the same corners .Each corner has to be in the same position .

Front top & Neck
Step 1: After you have made the 2 parts of the hexagon long aprox.18″(48cm) arrange the 2 parts as pic A
Step 2: Sew the back (as shown in pic A) then sew the shoulders, (see pic B)
Step3: Make 2 round more ( 3xdc ,ch2 ) in each loop along front and waist only .(See pic B)
Step 4: Work just front. Start first rd-from neck with (3xdc ,ch 2 sp) in each loop,and when rich to the waist turn around and work second rd the same (3xdc ,ch 2 )in each loop.Stop rd before last 2 loops.The last group (instead of 3xdc ) make 2 xdc,1 x sc and go to the second last loop and finish by making one a sl st.Turn around from where is left start rd 3 make in loop 1x sc,ch 2 go to the next loop and then continue as normal till the waist.Turn around again for the rd 4 and make the same as rd 2,stop before last 2 loops.
If you want a bigger bust you can make 2 full rounds more in front and then start decreasing for the neck.
Sleeves (see pic C)
Continue to work the sleeves after the shoulders are joined.It will be almost half of the sleeve made by the hexagon.
Work circular for the rest of the sleeve.
Approximate 16 loops to start 3 xdc ,one chain space for the next 4 rd.
From the 5th rd make 3xdc,ch 2 sp for the next 18 rd.At the round 22 multiply one group of 3xdc,ch 2 at the begin of the rd ,make in the same loop 2 groups of 3xdc.Make another 4 rd (no increasing after rd 22).Total will be 26 rds.
This will make the sleeve more flare to the wrists . You can make the sleeves shorter or longer by reducing or increasing the number of rds.
Bottom.
Need 10 squares (See Scheme)

Squares
1.magic circle (or 4 chains joined)
Rd 1.In loop 8 dc ,with ch 3 between as space.
Rd 2 .Begin- ch 2, then 2 x dc in the same loop continue to the next loop 3 x dc , ch 3 sp and rep.
Rd 3 .After rd 2 you will have 8 loops. Mark 4 loops as corners In each corner (mark) make a group of (3xdc,ch4 sp,3xdc)Then (between corners) ch 4,and sc into the next group after corner.(see scheme where is X marked has to be sc) then ch 4 skip one group of 3xdc,and go to the next corner.
Rd 4 In each corner group of (3xdc,ch2 sp,3xdc ) then ch 2,3xdc,ch2,3xdc.and rep.
After you finish the 10 squares, join them and and then swe to the waist.
When you join the squares you need to pull the needle through the half stitch BLO(from the back edge) and join with the other half of stitch. The 10 squares must be the same length with the waist.
After the 10 squares are fixed work along them 24 rd more .Each rd in each loop 3xdc,ch2.
Trimming
Along, wrists, hemline, front and neck one rd in each loop 2x sc,1xdc,2x sc , and between 2 x sc in each st in the group of (3xdc).
I tried be clear as possible i could , but if there is something that is not understood, do not hesitate to drop me a message here down on the page .
You must be logged in to post a comment.